Wednesday, August 29, 2012

How to Get Over a Fear of Flying

          When someone is afraid to get into the sky, it can really keep them from life. If you were so scared to fly that you wouldn't get on a plane to get to your sister's wedding or your aunt's funeral, that no only affects yo but the ones you love. A fear of flying is sometimes irrational. What I mean is, did you know that you are more likely to die from being stung by a bee than you are from flying. So how do you get over your fear of flying? Here are some tips for all you anxious fliers.
         First tips is not to share. Try to stifle your urge to discuss your anxiety about flying with the person sitting next to you. You'll be bombarded with people's personal horror stories of turbulent trips and other anecdotes which will only make you more nervous. I the topic does come up, simply change the subject so you won't absorb others' worries.
         Next, I would recommend sitting up in your seat. If it is the cramped quarters that bothers you, try booking a bulkhead seat where you might have a little more room. Immediately turn the air nozzle above you all the way up to prevent you from overheating. Keeping your face cool has been proven to make claustrophobic people feel less panicked. Afraid of turbulence? Sit on the axis of the plane, over the wing, where the motion is less pronounced.
        This next tip may sound obvious but, distract yourself. Be prepared for irrational thoughts, because you can't really prevent them. When you board the plane, slip an elastic band around your wrist, and whenever you have irrational or negative thoughts about flying, snap the elastic. It may hurt but it really does snap you back to reality. You should also bring something to do on the plane such as a book, crossword puzzle or a magazine.
       Finally, just take deep breaths and know you will be okay. Your heart may begin to beat rapidly if you are really scared. This can cause shallow breaths. If this happen  than just take a deep breath. Inhale for three counts and exhale for three counts. Too much shallow breathing can cause the bloodstream to fill up with carbon dioxide with can make you feel dizzy. Steadying your breath gives you a sense of control over your body and calms you down. A fear of flying is irrational and you have nothing to be afraid of. So just take a deep breath and everything will be just fine.

Tuesday, August 28, 2012

My Favorite Manicures of All Time

 
  An easy cute mani
           that everyone is sure
  to love!
These Newspaper nails are easy
and you can even do them with the
comic section if you want!

How cute are these sailor nails!

Use hole reinforcers to make a french
manicure in any color you choose. 

Oh my goodness! these nails
are to die for!!

I like these nails because you can use so many
different colors-the possibilities are endless.

Using a sponge you can crate an ombre
manicure effect.
This is my personal favorite.
I love the colors!

Sunday, August 26, 2012

Rainbow Brights

         Like may of the finest trends, the rainbow nail look probably started by accident- maybe an indecisive woman wore it out of the salon or a beauty editor tested polishes and forgot ti take them off. But wearing it well is no accident. Allow me to explain. Whether you are going for citrus hues or cooler blues and greens, pick colors that will match well together. Choose three different but similar shades. For example a blue, green, and aqua or perhaps a fuchsia, red and orange. Than paint them randomly on each finger (a random mix looks cooler than a perfect pattern). Pair the look with bright clothes and nice jewelry-you want to look playful, not like you are going out to recess. Don't be haphazard about the colors. I like to place the bottles next to each other to see what combinations look good together. I would also recommend a classic shape. With a jumble of colors, nails shouldn't be more than half an inch to an inch long. That's pretty long when it comes to nails, girls. Also, keep it simple. This is not the time to get all wacky with matte, glitter, sheer, or indigo glow in the dark polishes. Stick to the formulas that are glossy and opaque. And it you don't want to commit the colorful rainbow look on your fingers, try them out on your toes. They can look especially cute and youthful there. When it comes to rainbow brights, done right they can look fabulous, but done wrong it can look like a four year old colored your nails. However rainbow nails were created, they are a great every day look for just about anyone.


Saturday, August 25, 2012

5 Classic Makeup Looks


          Trendy makeup comes and goes, but there a re a few looks that stand the test of time-and for a good reason. Here's how to recreate them with ease.


          All Natural. Stick to a lightweight foundation or tinted moisturizer and dot concealer only where needed (on under eye circles and res spots). Than brush a very small amount of soft rose blush onto the apples of your cheeks going upward. A single coat of black or brown mascara adds definition and shine. Skip the eye shadow or try a sheer metallic bronze. For the lips a clear gloss or sheer lipstick. This look is also great for beginners because it is easy and doesn't cake on makeup. Rather it accentuates her beauty.
   

         Rock and Roll. Smooth black or gunmetal cream eye shadow over the lids. Than rim the upper and lower lashes with a thick line black liquid eyeliner. Smudge it slightly with a Q-tip. Dust over the eyeliner with matching eyeshadow. When lining the upper and lower lashes get the tip of the pencil or brush as close to them as possible. Dot concealer over any blemishes than stick a little clear or tinted lip balm on the lips. To much makeup on the rest of the face looks like you are trying to hard. This look is suitable for a concert or night on the town but not as much as an everyday work.

  Bronzed Skin. Pick a bronzer with a satin like sheen, not obvious glitter. Make sure you get a bronzer that is only one-half shade darker than your own, because you want this look to seen natural and not bronzer overload on just your face. Lightly dust it where the sun his across the face-on the nose, across the forehead, and high on the cheek bones. To make the skin glow, apply peach blush around the outer corners of your eyes, around the nose, and on the Cupid's bow of the mouth. Downplay shine on the rest of the face with translucent shades on he eyes and lips such as a copper cream eye shadow and tinted lip balm. This look is for experts only, it is super hard to get the colors to match up together and look good. 

           Red Lips. Choose a moist, satin finished lipstick. If your skin in fair, go for one with blue undertones and those with olive or dark skin can try one with more brown orange undertones. First, fat on color with your finger to avoid harsh lines. Limit your other makeup. Keep skin looking natural with tinted moisturizer and concealer. than apply a light dose of rosy blush, natural brown or beige eyeshadow and two coats of mascara on the upper lashes only. The lips are the vocal point of the face in this makeup look, so it is best not to distract from it. This look should be saved for special occasions like a business party, a funeral or a wedding.


          Cat Eyes. Line you upper lid with a creamy black pencil. When you reach the outer corners of the eyes, fatten the line and angle it away from the lashes. Smudge it ever so slightly with a cotton swab. Soft rose or peach blush should be applied to the apples of the cheeks, going outwards. Than a dusting of a loose translucent powder makes the face seem finished. Rose or peach lipstick is just as appropriate as a thick burgundy or beige these days and I personally like it better with this look.


Sunday, August 19, 2012

DIY: Cheese Grater Earring Holder

When you need a place to store your earrings, little did you know you can use what you have at home. Here's a secret: Your cheese grater doesn't really want to grate cheese. It really wants to show off your earrings in the cutest way possible! Give it a chance!
What you need:
• small cheese grater
• paint (of your fave color)
• small metal hooks (used to hang pictures)
• four beads (the hooks should fit inside the bead holes)
• strong glue, like E-6000
• tape
Instructions:
1. Paint the cheese grater a fun color.
2. Once dry, attach the four hooks, one to each corner of the bottom of the cheese grater using the strong glue. Place a piece of tape over the hook to hold it in place until the glue is dry.
3. Once the glue has dried, remove the tape, and put the bead on the curved part of the hook. This will protect the surface of your furniture.
4. Hang earrings from all the different holes in the cheese grater.

Friday, August 17, 2012

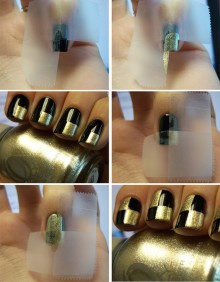
Nails: Special Effects

         Nail art is having a moment. Pull it off stylishly for a special event or just a night on the town. Either way, it's good to have some "special effects" in your nail polish drawer.

         Shatter. Brush a shatter topcoat over your existing polish, and it instantly starts to crack, revealing bits of your base colors it settles into a broken-glass pattern. Formulas can be a bit gummy sometimes, so you only need one thin coat A(too  much and it starts to look like globs of tar!). And thought they come in various colors, I recommend black with a colorful, gold, or silver base coat. Whatever matches your mood and outfit!

      
   Magnetic Manicure. These polishes come with a magnet that create ripples of a darker color in the actual polish. Here's how it works: metallic shades-gold grey and purple-contain iron powder. When you hold the magnet over it for 30 seconds, it reacts with the iron powder to form ripples. For best effects, paint one nail, use the magnet, paint another, use the magnet, and so on. 
         Press-On Polish. Sally Hansen Salon Effects Real Nail Polish Strips are made from actual lacquer that contains plasticizer, allowing the color to stretch and conform to the nail and look as rich and reflective as polish from the bottle. In my test it took about ten minutes to apply the strips (smoothing them on a filing the excess), then I was  free to use my hands-and the color lasted about a week before showing a chip.

Saturday, August 11, 2012

How to Maximize Your Shine

          Gleaming hair is a sign of youth and vitality, so I cringe when I see a woman with lackluster hair-it ages them. Pollution, harsh chemicals, and heat styling all turn hair dull, but a few extra steps will make your hair shine again.
  • Start in the shower. Look for a shampoo and conditioner with shine-enhancing ingredients like olive oil, jojoba, or rice proteins. Alternate these with your regular formulas to prevent buildup. Be wary of of clarifying shampoos, which can deprive hair of much needed moisture after shampoo, apply the conditioner evenly, and be sure to rinse well. 
  • Prep Work. Towel dry you hair and than use either a glossing cream or a shine serum with panthenol (pro-vitamin B5). Glossing creams are lighter and have less silicone, so they're more appropriate for fine to medium hair. Use shine serum if you have frizzy, course, or curly hair. Massage a quarter size dollop evenly through your hair. (avoid saltwater sprays: they tend to leave a matte finished product.) 
  • Dry the right way. Place a round brush under a section of hair and hold the dryer so the nozzle aims downward-never up against the shaft. Slide the brush down from roots to ends without twisting it to seal the cuticle. 
Quick Shine Booster: While your hair is still warm from the dryer, flip it upside-down and mist the ends with a shine spray. This ensures you won't get to much product near the roots, which can leave hair greasy and flat. If you need a touch up during the day, spritz a little spray on your hands and run them lightly through your hair

Tip: For color-treated hair, apply deep conditioner with natural oils once a week for a glossy look.