In 2012 there were some really fab songs (and some not so great ones). In my opinion these songs really were the best of 2012. This is just my opinion and if you have some different ideas of what were the best songs I would love for you to post them in a comment below.
1. What makes you beautiful, by One Direction- I say this because I think it really jump started their career and I heard it so many times on the radio and couldn't help singing along.
2. We are Never Getting Back Together, by Taylor Swift- I think that it is really catchy and cute.
3. Some Nights, by Fun- I love the vocals on this song.
4. Call Me Maybe, by Carley Rae Jepson- The nation couldn't stop singing it.
5. Drive By, by Train- The vocals were really rich and the music video was cool.
6. Stronger, by Kelly Clarkson- It proved a point that won't kill you will make you stronger and uplifted many souls.
7. It will Rain, by Bruno Mars- I have always been a fan of Bruno Mars and this so g was espeshilly good because it pours out his heart.
8. Super Bass, by Nikki Manaj- I was the perfect dancing song and everyone had to know every last word of it.
9. A Thousand Years, by Christina Perri- It touched many hearts and was even featured in the last Twilight movie.
10. Better Dig Two, by The Band Perry- It may be a country song but the vocals and lyrics are astonishing. And the song overall relays an important message.
Monday, December 31, 2012
Friday, December 28, 2012
We Heart It
 So I was introduced to a really cool new site called We Heart It (weheartit.com). It's a site where you can look at pictures. I like it because you can see cute hairstyles, vintage, wedding stuff, and really anything because it is endless. You could even upload a picture from another site. It is so cute! I want to thank my friend Hannah for getting me into it, and my friend Jordyn for constantly showing me new things. I would recommend getting your friends into it because its always fun to see what they heart. I just think it's a cute website like tumbler or twitter and wanted to share it with you guys.
Monday, December 24, 2012
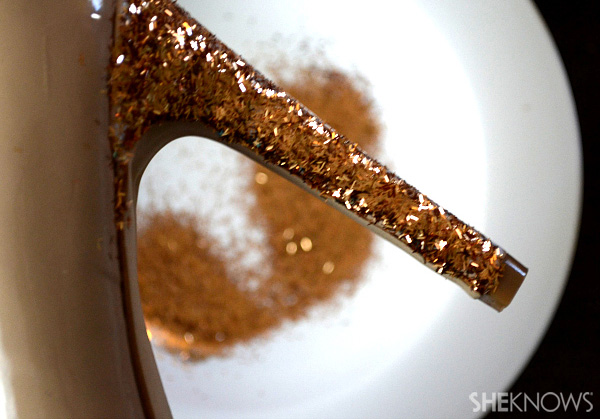
DIY: SPRUSE UP OLD PUMPS
DIY: spruse up old pumps With GLITTER
Between holiday gifts, plane and train tickets, gas money and a ticket to that fancy NYE ball, it's no surprise we're left with just a few cents to our name come New Year's. But don't think that means you can't rock some stellar new pumps to match your party dress. With this super easy and cheap DIY, you can turn tired old shoes into sparkling new ones just in time for New Year's!
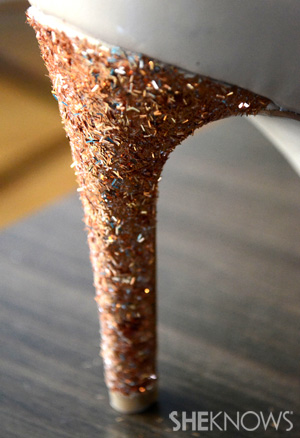
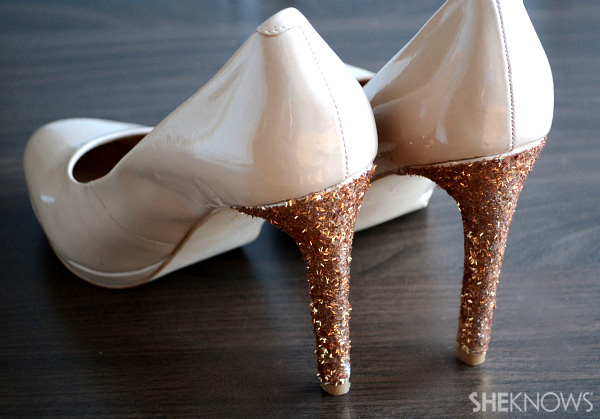
For less than $5, you can have sparkly new shoes that are perfect for that office holiday party, your NYE bash or just date night with the hubby. Plus, you can customize the color of glitter to match your shoes or, if you're feeling ambitious, cover your entire shoe in glitter!
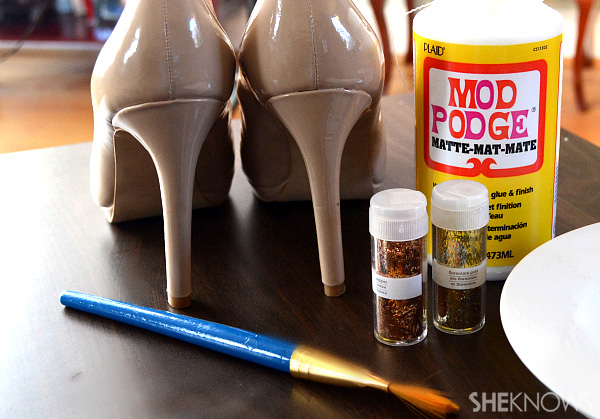
Supplies:
- Old high heels
- Mod podge glue
- Glitter
- Paintbrush
Instructions:
1
Mix paint and 1/2 the glitter together
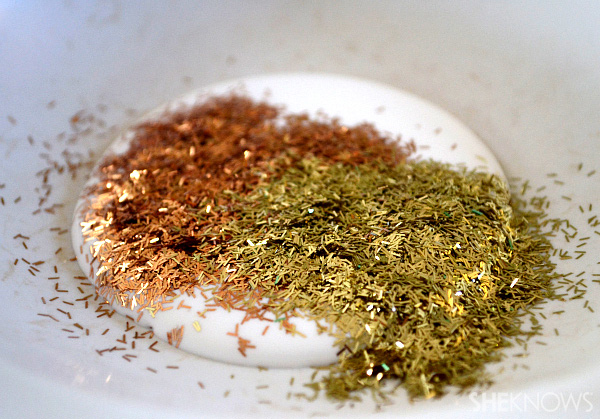
2
Paint glitter glue onto shoe heel

3
Cover glue in dry glitter
4
Dry
Wednesday, December 19, 2012
Sample Boxes

 The cutest new way to try out items is sample boxes. You pay a certain subscription price, just like magazines to have the boxes shipped to you. These are boxes that are sent to you via mail and they contain cute little items that are new and 'in'. The can have makeup or nail polish or cute pens and notes. Some are better than others, but I simply adore them. These are some sites were you too can get sample boxes: www.loosebutton.com http://www.birchbox.com/?raf=x4c8a and http://www.zadidoll.com/p/subscriptionsampling-boxes.html . These are my favorites.
 Friday, December 14, 2012
The Shooting in Connecticut
A man killed his mother at home and then opened fire Friday inside a Connecticut elementary school, massacring 26 people, including 20 young children, as youngsters cowered in their classrooms and trembled helplessly to the sound of gunfire reverberating through the building.
The shooter, who sources identified as Adam Lanza, 20, shot his mother, Nancy Lanza, in the face at their home in Newtown, Conn., then went to nearby Sandy Hook Elementary School where she taught and gunned down her entire class, bringing the death toll to 28, according to sources.
Lanza was found dead inside the school, according to officials. Eighteen of the children and six more adults were dead at the school and two more children died later, according to Connecticut State Police Lt. Paul Vance.
The shooter was Ryan Lanza, 24.
The rampage, coming less than two weeks before Christmas, was the nation's second-deadliest school shooting, exceeded only by the Virginia Tech massacre that claimed 33 lives in 2007.
Law enforcement officials speaking on condition of anonymity said that Lanza killed his mother, Nancy Lanza, then drove to the school in her car with at least three guns, including a high-powered rifle that he apparently left in the back of the vehicle, and shot up two classrooms around 9:30 a.m.
A custodian ran through the halls, warning of a gunman on the loose, and someone switched on the intercom, alerting people in the building to the attack -- and perhaps saving many lives -- by letting them hear the hysteria going on in the school office, a teacher said. Teachers locked their doors and ordered children to huddle in a corner or hide in closets as shots echoed through the building.
The vehicle the suspect drove to the school was registered to his mother. At least three guns were found -- a Glock and a Sig Sauer, both pistols, inside the school, and a .223-caliber rifle in the back of a car, authorities said.
Sources told Fox News the guns used in the shooting were owned by and legally registered to Nancy Lanza.
Most of the children were between age 5 and 10 it makes me cry to thank what a world it is where you aren't even safe in your own school. These children had their whe lives ahead of them they could have had children of their own, marriages, graduation, hopes, dreams. But they were stripped of that so young. The parents probally already had presents from Santa hiding in their closet or garage. Those presents won't be opened and they will have to face that. No parent should ever have to bury their child. So on Monday wear blue, the school color, in remembrance of those young children who were killed in the mass murder.
Monday, December 10, 2012
Mani Monday: Neon and Gold Nail Tutorial

1. First paint your nails a neon pink color. You can actually use any color you want, but I thought the neon pink was fun and girly! Try using “Forget Me Nots” by Essie—it’s a gorgeous strawberry milkshake pink!
2. Then, starting from the middle of your nail and going from left to right, paint diagonally with a different colored polish. She used a bright orange polish from American Apparel called “Neon Coral.” It’s ok if your line isn’t perfectly straight because you’re going to paint over it next!
3. Using a nail art pen, paint over the diagonal line between both polish colors. I love how she used a metallic gold color because it adds contrast and makes it super cute.If you don't have a nail pen use use tape on step 2 and 3 to make the lines straight.
Just finish off with a clear topcoat and there you have it! These nails are pretty bright, but I think that’s what makes them so fun. You can give your colors a fall update by using gray, maroon, dark green, navy, or eggplant. It’s really up to you!
Saturday, December 8, 2012
DIY: Bow Bun
 I was searching Pinterest for something really cute to share with you guys and I found this adorable bow bun idea. I hope y'all try it, I know I will. It would look precious with a vintage style outfit.
Thursday, November 29, 2012
Rolled Pants: Cute But How is it Done?
Rolling your ants instantly makes you look seem effortless and it adds an element of personal style- it shows your hand. Plus it is an easy way to show off a great pair of shoes. However, the way you roll them can make or break and outfit.
 There are two styles you can roll: slouchy trousers, like boyfriend jeans, or skinny jeans. In both cases, hefty fabrics like denim or twill work better than drape-y ones like silk or Tancel. Never try to roll wide-leg pants, since it is easy to catch your heel in the cuff. Not to mention the fact that it looks clunky and undefined.
As a rule it is best to roll the hem twice, with the width of one one and a half inches. Keep it mess; a roll that's too flat and neat looks contrived. With slim-cut jeans, I love a single fold that is two and a half inches wide for a 50's beatnik look. Or you can roll it twice and keep the cuff thin.
Rolling the pants means you don't need to hem them, so you have a lot of flexibility with flats and heels. For a tomboy look, try oxfords; for a dressier spin, wear heels. But no wedges- they are too clunky.
To show off the skinniest part of your ankle, roll the pants to about four or five inches above the ankle bone. But if you're self-conscious about thick ankles, this look might not be for you.
Saturday, November 24, 2012
How to Try a Trend
Whether you have taken part in one or even started one, trends have been in the lives of many people. A makeup trend is no different from a clothing trend: It can be scary to step out of your comfort zone. But if you see a bright lipstick or colorful shadow that inspires you, I say go for it. The real question we face all to often is how to try it. In this post I will tell you how.
Make it real. Makeup that's done for the runway or a photo shoot is exaggerated to look good under powerful lights, not a regular day. The key is to adapt to a single element. Lips are the easiest. Try applying a new color with your fingers rather than a brush so it doesn't look painted on. Eye trends are a little trickier, but a colored eyeliner is an easy way to go adventurous.
Don't go retro. I wouldn't recommend trying to start a trend, or even follow one that is retro. Avoid trends that are a reference to the past too literally. Forties-shaped eyebrows are always going to look costumey and, let's face it, old.
Be honesty with yourself. A shade might be fashionable at the moment but skip it if it clashes with your complexion. If you struggle with ruddiness, don't wear red shades that will magnify it. Fuchsias are more flattering because they have a blue base. Around the eyes browns and purples look absolutely great on just about everyone.
Get comfortable. A good way to get used to a trendy look is to wear it around the house. When you are ready to bring it out into the world, wait for a dinner day with your friends as apposed to a day at the office-you are more likely to feel confident and get complements. Also your friends will most likely tell you what works on you and what doesn't.
So next time you try a makeup trend (or any one for that matter) keep in mind these tips, and hopefully your trend will look stunning.
Thursday, November 22, 2012
Black Friday
If you are going black shopping than it is important to be safe. Many people will stop at nothing to get the deals on this after thanksgiving holiday. The important thing to keep in mind is to be safe and get the good deals. Many stores are opening earlier than ever, some as early as 4:00 am thanksgiving morning. Many workers are upset but the shoppers couldn't be happier. Keep safe and get the good deals!
Wednesday, November 21, 2012
A Pain in the Neck
Oversize handbags never seem to go out of style, but you don't get fashion points for the neck and shoulder pain that tends to accompany them. The fact of the mater is, the hold more, which causes them to weigh more, when causes more and more stress on your shoulders and neck. You can't make it go away completely, but if you are a big handbag kinda girl, here are a few tips on how to work out the kinks.
- Train yourself. Try to train yourself to switch the side you carry your bag on. Try switching every ten minutes or so to avoid causing one shoulder to much stress. Also be careful no to scrunch up the shoulder it's on.
- When you put it down. Take a few minutes to stretch you shoulders or back when you rest and put down your bag. Say you are at a cafe and waiting for someone. Bend your head forward, right, left and back in careful, slow movements. Don't try to swivel it around like a doll. After all, you head isn't a ball and socket joint.
- If you start to feel. If you start to feel your neck and shoulders tense up you should "reset" them. You can do this by bringing you shoulders to your ears and holding this position tightly for three seconds. Than drop them, letting your arms hang loosely at you sides. This will help to relax your shoulders and especially your neck.
- At the gym. When you are working out at the gym and you carry a large bag, add a few moves to strengthen you shoulders and back muscles. Lateral raises and pull-downs, push-ups and planks all can help.
Thursday, November 15, 2012
Cute DIY: Workout Shirt
So I was looking around for a really cute idea to show you guys and I stumbled across this. It is a way you can turn your old, never worn T-shirt into something more. A super cute workout shirt. All you will need is an old T-shirt and a pair of scissors.

- First locate you materials.
- The second step is to cut off the sleeves, back collar, and bottom of the shirt.
- Thirdly, flip your shirt over
- Than, cut the back into a V
- Fifthly, use the bottom of the shirt that you already cut to tie the back together as shown.
- Knot it as you see in step 6.
- Lastly, cut the shirt upward. The picture shows all the steps.
Sunday, November 11, 2012
Book Review: The Help
Okay, so I know all of y'all have seen the famous movie, The Help. Well it was based off a fabulous book by Kathryn Stockett. The book features black maid, Aibileen as she is working for her 17th white child. It also includes Skeeter, a white woman who tries to act like a proper lady. She attends the bridge club and is in the league. She writes the Mrs. Myrna article in the paper. She asks for the help of Aibileen and when one thing leads to another she starts to write a book of stories of black maids and their lives. After much work and dedication the book is finished. The book receives amazing reviews, but when the book is suspected to be based on Jacksonville, Hilly who has an embarrassing part in the book, try's to persuade people it isn't. This story is a must read. It is my new favorite book. It's beauty and glory is not even justified in this short summery. It makes you smile and it will make you cry. I love the wording and couldn't put the book down. I give this book 5 out of 5 stars.

Saturday, October 27, 2012
DIY: Cute Shoes

So everyone has those never worn white shoes, and now you cam decorate them in a way cute way. This idea is totally designer inspired. I think the idea is way cute and it is super easy. All you will need is poster board or construction paper, the shoes, and fabric markers in various colors. Step one is to use the paper to cut out a design whether it is stripes or zig-zags. Whatever make you happy. Than you have to trace it with a pencil. trace it all the way up the shoes. Once you have done that, you can color it in. And really, thats all there is to it. So I hope you love your new and improved shoes.
Monday, October 22, 2012
Word Overuse: We all do it
We are all, like, totally guilty of the repetition of certain words and phrases to the point of nausea. I myself admit to it. And celebrators aren't any exception. They do it too. Burnt what words and phrases are most abused by our favorite celebs? Well, Evan Rachel Wood admits to using "dude" way to much, and Kim Kardashian says she uses "OMG" to her sisters too much. Kate Bosworth thinks that "chic" is the most overused word in the fashion dictionary. Like most of us, Charlize Theron uses "like" too much. When asked this question to Busy Phillips her response was "I use 'totes', 'totes McGoats', and 'totally'. In a twist, Felicity Jones thinks he uses the term "I reckon" all too often. For German-born Diane Kruger, it's "scrumptious". She says she just learned it. As you can see, celebrities overuse words and phrases just like us. What word or phrase do you misuse?
Friday, October 19, 2012
Halloween Costume Ideas
I have to say, out of all the months, october is my favorite. Maybe its because the air is fresh and crisp or the leaves are starting to change. Maybe its because the air is just right in LA (lower Alabama). But probably because October has my favorite holiday (besides christmas of course!), Halloween! I absolutely love it! I think decorating my room for the occasion is absolutely so much fun. I also love dressing up for costume parties or to pass out candy. I don't know what about it is so great but to me, it just is. So what I will actually be blogging about today is for all you girls who either still dress up or just need a costume for a party. I'm doing this cause I used to never be able to decide on what to go as, and I thought I'd make it just a little easier for all y'all out there.
- Pirate
- Witch
- Ghost
- Nurse
- Baseball player (the cute girly kind)
- Alice in Wonderland
- Historical figure
- Kitty Cat
- 20s Flapper
- Police Officer
- Robin Hood
- Cowgirl
- Skeleton
- Any Animal
- Angel
- Devil
- Angel/Devil Mixcross
- Disco Child
- Cleopatra
- Hippie
- Fairy
- Little Bo Peep
- Princess
- Maid
- Mummy
- Vampire
- Dorothy
- Bride
- China Doll
- Rag Doll
- Can-Can Girl
- Nerd
- Sailor Girl
- Mermaid
- Rockstar
- Scottish Girl
- Little Red Riding Hood
- Snow White
- Jill (But you would need a Jack)
- Wonder Woman
- Bride of Frankinstien
- Cheerleader
- Doctor
- Mime
- Minnie Mouse
- Army Girl
- Jasmine from Aladdin
- Daisy Duck
- Girl from Colonial or 1800's period
- A Zombie Disney Character

This post is to throw some ideas out there. Find one you like and google it. Tons of things will pop up and how you can make it. Be sure to let your creative juices flow. Also, look in the dictionary. You could pic an inanimate and random object. There are always things around you for inspiration. Dress as a famous person, your role model, what you want to be when you grow up, someone of TV, an actor, your favorite Disney person, or from a certain era. The possibilities are endless! Have an awesome Halloween, y'all!
Tuesday, October 9, 2012
Mason Jars
So recently I've been really into Mason Jars, mostly because of all the really cute and neat things you can do with them. I figure the best way to share my love of these jars it by blogging it. You can find so many more fun and creative ideas at http://beautyandbedlam.com/ideas-for-mason-jars/
 So the first thing I discovered you could do with them is make a match holder. I think they would be great for decoration. All you have to do is replace the top with sandpaper and fill the jar with matches. It's pretty simple.

Second, I saw this idea for light holders. I guess if you were having an outdoor party or southern wedding it would be really cute. The only thing you have to do is wrap and secure some twine around the top. Than fill it a quarter way full with sand and put a little candle in it.

Another cute idea would be to use a Mason jar for an organizer. Yes you heard me right. If you glued them together they could be used to organize thinks like office materials. So cute right?
So the first thing I discovered you could do with them is make a match holder. I think they would be great for decoration. All you have to do is replace the top with sandpaper and fill the jar with matches. It's pretty simple.Second, I saw this idea for light holders. I guess if you were having an outdoor party or southern wedding it would be really cute. The only thing you have to do is wrap and secure some twine around the top. Than fill it a quarter way full with sand and put a little candle in it.
Another cute idea would be to use a Mason jar for an organizer. Yes you heard me right. If you glued them together they could be used to organize thinks like office materials. So cute right?
Sunday, October 7, 2012
DIY: Macrame Bracelets
Growing up by the beach in Southern California, the ability to knot a macrame bracelet was practically a right of passage. Although those days are long behind us, we’ve never forgotten the ever-so-simple square knot technique. This time, however, we’re replacing hemp and wooden beads for more updated elements like colorful nylon cord and glossy metal charms. Happy knotting!


You’ll need:
- 4 yards of 0.5mm chinese knotting cord
- a connector or charm
- an embroidery needle
- a pair of scissors
- flat nose pliers (optional)
- a lighter (optional)
Start by cutting the knotting cord into two 30 inch, two 20 inch and one 10 inch lengths. Fold the 20 inch piece in half, pull the loop through the ring, fold it over the ring, and pull the rest of the cord through the loop. Repeat the step on the other side of the ring. These strands will be anchored and remain stationary.
Center the 30 inch cord under the two middle strands. Fold the right cord over the middle strands and under the left cord. Pull the left cord under the right and middle strands and through the loop on the right side.
Pull tightly and slide the knot up to the top.
Finish the 2nd half of the square knot by folding the left cord over the middle strands and under the right cord. Pull the right cord under the left and middle strands and through the loop on the left side.
Pull tightly and repeat the steps – left, right, left, right . . . Continue knotting until the desired length is reached. Keep in mind that the clasp will take up approximately half an inch.
To finish the knots, thread one of the cords onto a needle and sew up the center of 3-4 knots along the backside. Pliers will help pull the needle through the tight knots.
Repeat the same step on the other cord.
After sewing up both knotting cords, trim away any excess. Save the scraps and melt the tips with a lighter to seal it for extra hold. Repeat the same exact step on the second half of the bracelet.
To make a sliding closure, shape the bracelet into a circle and overlap the middle strands. Use scraps to temporarily tie the cords together at each end.
Take the 10 inch cord and center it under the strands. Start tying square knots exactly the same way the bracelet was executed.
Stop at about half an inch and sew the knotting cords into the backside of the closure. Remove the temporary ties.
The two sets of middle strands are now the adjustable ties of the bracelet. Adjust to fit the wrist and tie each end into knots. Trim away any excess.
Your adjustable knotted bracelets are finished!! xx
Subscribe to:
Posts (Atom)